 Through this tutorial I will show step by step how to move an object in Flash by using the arrow keys on the keyboard. I will be using Flash CS4 and ActionScript 3.0.
Step One:
The first thing you need to do is to open a new flash document. Then, import an image that we will move around or create your own. You can import an image by selecting File >Import > Import to Stage.
 Step Two:
Once it is in place, convert it into a Movie Clip symbol by selecting the image and then choosing Modify > Convert to Symbol and then selecting Movie Clip and hitting OK.

Step Three:
Also, you need to name the instance in the properties panel "square_mc" (to access the properties panel you must have the MC selected). We will be referencing the Movie Clip by "square_mc" in ActionScript.
In the timeline create a new layer and name it "actions" and rename layer 1 "images".
Step Five:
Next, click on the first frame of the "actions" layer and open the actions panel.
Step Six:
Type the following in the actions panel:
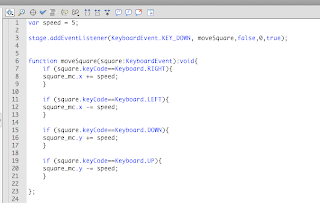
var speed = 5;
this will store the variables speed so that when a key is hit the image will move 5 px. Then add an event listener to the stage by typing:
stage.addEventListener(keyboardEvent.KEY_DOWN, moveSquare, false, 0,true);
this tells Flash to listen for a keyboard event.

Step Seven:
After that we need to create a function to listen for the key strokes. Usually listeners are applied to an object but this one we will apply to the stage by typing:
function moveSquare(square:KeyboardEvent):void{
if (square.keyCode == keyboard.RIGHT){
square_mc.x += speed;
}
}
this moves the image to the right 5 px each time the right arrow key is hit.

Step Eight:
repeat the code in the function for up, down, and left as it is shown below

Now, your image should be able to move around the page by using the arrow keys on your computer! Now all you need to do is publish it.
Well done!
click here to see it in action.
References:


